
Video is one of the most engaging forms of content. Unsurprisingly, companies, creatives, and professionals use online video camera tools for almost everything. Whether creating a tutorial, expressing a complex idea, or promoting a product, video provides that perfect blend of visual and auditory information to let you communicate clearly.
Some people feel intimidated by creating online videos because they think it requires fancy hardware, lots of planning, complicated video editing software, and a spark of artistic talent. Sound familiar?
Luckily, some online video cameras make the process more accessible than it sounds. While your video might not win an Oscar, tools like Zight (formerly CloudApp) can help you produce quality, professional videos in no time, even if you’re not a professional video creator.
What is an Online Video Camera?
An online video camera allows you to record videos of yourself. You can also include audio of yourself speaking if you have a microphone.
Today, many laptops include a webcam and microphone, but hardware without software is like a puppet without strings. You’ll also need reliable online video camera software to start creating content.
If your computer comes with a webcam, it likely includes native software that lets you use your online video camera. Native software gets the job done for basic projects. But if you use your video camera professionally or plan to record many videos, consider a more robust third-party tool like Zight.
Zight allows you to record video, add audio, edit it, and share it with your audience, employees, and clients. Bring life to your messages by adding a face and voice to the virtual name and email. You only need a webcam, a computer, and a stable internet connection. That’s right–you don’t even need a subscription! Zight is free.
How Do You Share a Video Online?
More than likely, you’re creating a video intending to share it. Once you use your video camera to create a video you’re happy with, it’s time to send it out!
This is where things can get tricky. Video files tend to be quite large. They’re difficult to send through email or instant messaging systems. Some email clients will degrade the quality, making your video look choppy and pixelated.
One option is to upload your video to a video-sharing site like YouTube. You can also upload it to an online storage space like Google Drive or DropBox.
If you use Zight, video sharing is simple. We can host the video on our private and secure server. You only need to share the link with your friends, clients, or co-workers.
General Use of Online Video Cameras
Virtual communication can be a powerful catalyst for success in education, business, and personal use. Here are a few areas where you can incorporate a video camera tool into your life.
1. HR training, situational role-play, or conflict de-escalation
An online video camera is handy for training employees. You and your employees don’t need to travel. You can train them by sending an informative video with a complete training lecture or demonstration, which they can easily watch and rewatch at home.
According to Forrester Research, employees are 75% more likely to watch a video than to read a text like emails, web articles, or documents. Online videos allow you to be creative and create something fun and memorable!
Once you create the video, you can use it repeatedly in employee onboarding. This cuts down both the time and cost that goes into employee training. Even if you have to update the video occasionally as your processes change, it’s still a much easier task than repeatedly giving the same in-person lecture.
2. Filming an online course
Make learning fun and engaging with a recorded online course. Including your face and voice brings new life into the video and makes students feel you’re teaching them in person.
Listening to an online course is far more engaging than a printed lecture that requires hours of tedious reading, especially if you develop something creative and interactive.
Students or customers can watch and listen as you demonstrate complex topics or walk through them step by step. If the viewer is still confused, they can pause and rewatch the video.
3. Content creation on social media
Video is one of the most powerful and influential forms of content on the internet. According to Google, 60% of American consumers would rather watch a video than live TV.
Books, blogs, and other written content forms still hold much value. However, videos are becoming more relevant every passing year.
Our online video recorder will allow you to create an impressive video, engage with your audience, and convey your message in the best possible way.
Best Online Video Camera and Webcam Recording Tool – Zight (Formerly Cloudapp)
Zight is an innovative platform that empowers users to effortlessly create high-quality videos without expensive equipment or extensive technical know-how. With its sleek and intuitive interface, Zight simplifies the video creation process, allowing you to focus on your content and ideas.
What sets Zight apart is its seamless integration of features that cater to all your video recording needs. Whether you’re recording a short message for a client, a tutorial for your online course, or a fun follower vlog, Zight has got you covered.
Lastly, Zight revolutionizes how you approach video creation, making it an indispensable tool for content creators, educators, businesses, and anyone looking to communicate effectively through video.
How Do I Use Zight’s Online Video Camera?

Zight’s online video camera tool is compatible with iOS, Chrome, Windows, and Mac. To record a webcam video on any of the operating systems, follow these steps:
- Download Zight to your computer.
- Click the Zight file in your download folder to open the installer.
- Install Zight on your computer.
- Create a Zight account or sign in to an existing account when prompted.
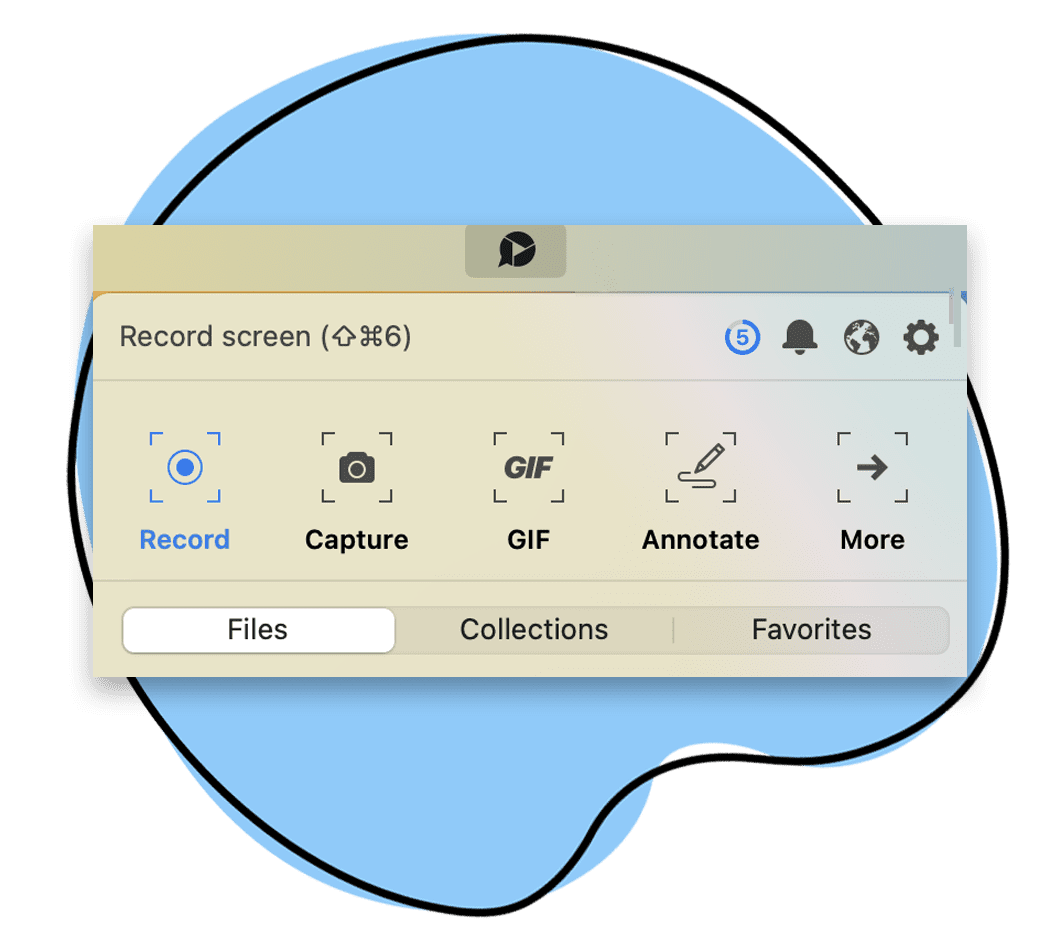
- From the main home page, tap the triple dot icon on the top of the Zight.
- Click the second option from the drop-down menu, “Record Webcam.”
- Select the options “Video recorder full screen” and “video only.”
Here’s what the triple dot looks like:
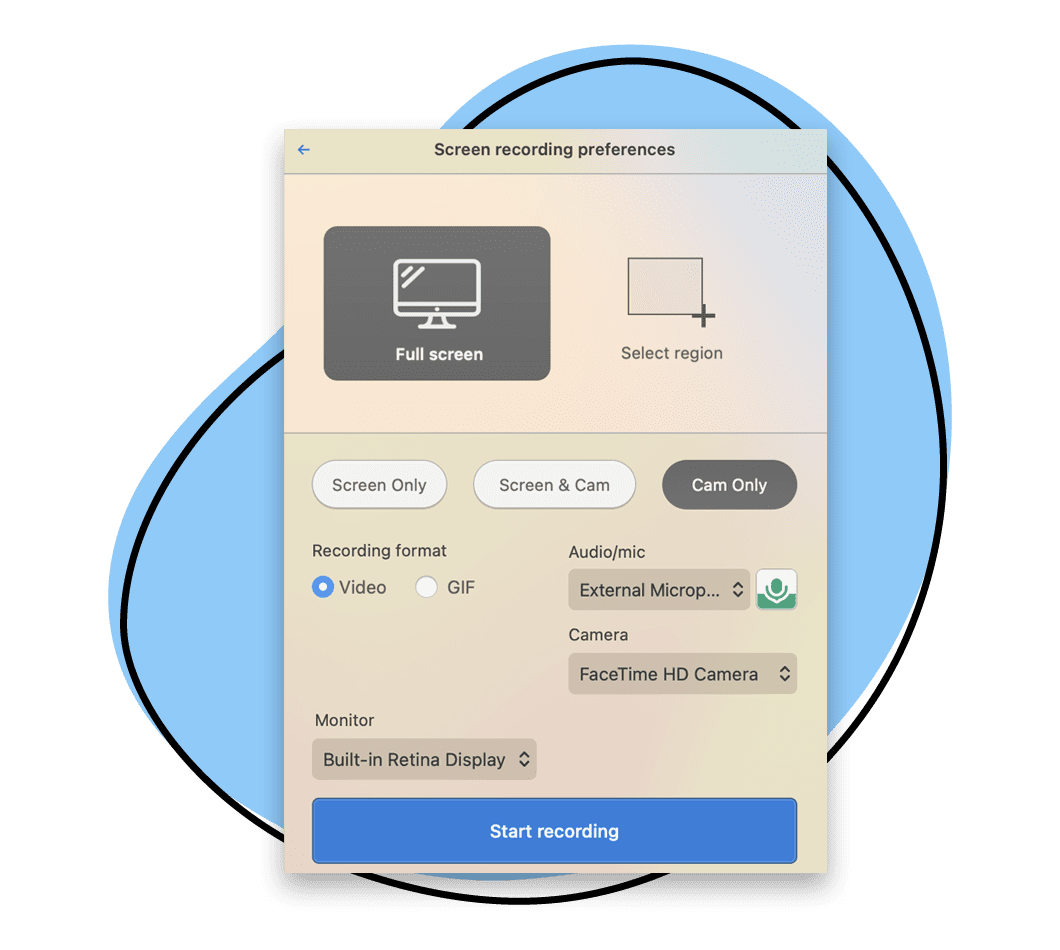
Zight can record your entire screen or only a region, depending on what you want to do.
If you’ve used Zight before, it will remember your past state. It may still be set to another recording option, such as the region feature. If so, choose “Fullscreen” to access the “Cam only” option.
When you select “Cam only,” a screen will display just your webcam’s output.
While the audio feature is enabled by default, you must confirm before starting the recording. A green mic indicates the audio feature is active. The green background will fluctuate vertically according to your audio input level.
Zight will detect any other input devices created in your MIDI settings.
Once you’re ready to start, click “Start recording.”
Why Record Video Online with Zight?
Zight brings life back to digital communication by adding a face or voice to the virtual name and email.
Here are a few reasons why over 3 million industry leaders use Zight to communicate faster and more effectively.
1. Improve engagement
Convey information quickly and efficiently–without losing the personal touch.
Our online video camera captures your face and voice and helps you build genuine relationships with clients, co-workers, and partners.
2. Full-screen screen recording
Record your screen, face, and voice individually or simultaneously. Capture your entire screen or choose a target region. No matter what you want to create, Zight makes it easy.
3. Easy to use
Zight’s video camera software does not require a guidebook or tutorial. There is no learning curve. Our intuitive software allows you to record your webcam videos in seconds. Just download and go!
4. Flexible to your setup
The Zight video camera is fully compatible with iOS, Mac, Windows, Linux, and Chrome. Download from the Apple Store for Mac and iOS, the Microsoft Windows Store for a PC, or the Chrome Web Store to add the extension to Chrome.
Plus, whether you’re using internal or external tools, Zight is compatible. Use USB webcams, standalone microphones, or built-in hardware as your video and audio input source.
5. Free forever
Zight is available for free with no hidden charges. You can access all the basic features without paying a single penny. You only need a computer with a webcam and a stable internet connection.
What Are Zight’s Online Video Camera Features?
Connect with your audience with our unbeatable Zight video camera. Here are some of its features:
1. Refine your video with built-in tools and settings
Record your video just how you want it! Alter the quality, switch on mirror mode, or make it full-screen. For audio, adjust the volume and decrease the echo effect with ease. Once you’ve captured your video, edit it inside Zight by adding annotations or trimming unwanted parts.
2. Share in seconds
You don’t need to download or upload your video to different platforms to share it. Zight will automatically generate a shareable link and copy it to your clipboard. From there, paste the link anywhere to share your video with your audience, clients, or employees.
3. Create high-resolution captures
Record videos at resolutions of 720p, 1080p, or 4k. Webcams can sometimes compromise the resolution quality, but tools like Zight make it possible to record video online at a higher quality.
4. Store your online video in the cloud
Zight’s webcam recorder knows how important it is to keep files secure.
Our multi-layered security keeps your data safe! Zight is GDPR compliant, and our AES-256 encryption and Amazon AWS data centers adhere to the highest enterprise-level standards.
All stored webcam videos are monitored 24/7. Record and share your webcam video with confidence!
10 Other Online Video Cameras You Should Know About
Apart from showcasing the brilliance of Zight, we have also listed ten more exceptional video camera choices that deserve your attention. These online video recording tools offer various features and options to suit different user preferences and needs.
Whether you’re a content creator, educator, or business professional, there’s an online webcam recorder on this list that will help you record videos quickly, easily, and with excellent quality. Let’s check the other video recording tools.
2. Web Camera

WebCamera.io is the perfect companion for those who want to create engaging videos using their webcam effortlessly without downloading or installing. It’s designed to be user-friendly and caters to beginners and experienced users, making it a perfect choice for hassle video recording from start to finish.
With its clean and intuitive interface, you can quickly begin recording videos with just a few clicks, eliminating unnecessary complexities while ensuring your message comes across effectively. Additionally, you can solely focus on capturing videos using your webcam with the webcam recording feature provided by this video recorder.
Furthermore, what sets, WebCamera.io apart is its convenience. You can access the online video recorder directly through your browser, requiring a reliable internet connection to start capturing your videos. Start capturing your moments crystal-clearly, ensuring your message comes across professionally and clearly.
Pros
- Easy-to-use platform with straightforward recording capabilities
- Supports high-quality video recordings, ensuring professional-looking content
- The webcam recording option allows users to focus solely on their webcam footage
- No downloads or installations are required since its accessible through the browser
- Suitable for both beginners and experienced users
Cons
- Some advanced features might be limited compared to other tools
3. Veed

Do you need a versatile video camera for webcam recordings and screen captures? Veed.io‘s video camera tool has got you covered! This all-in-one video recording tool caters to your needs whether you want to create engaging tutorials, record online meetings, or even jazz up your social media content with a mix of webcam and screen recordings.
With Veed.io online video recorder, users can record webcam videos without downloading, providing a direct and engaging way to communicate with their audience. The platform also supports screen recording, allowing users to capture webcam and screen simultaneously for comprehensive video content.
Its user-friendly interface allows users to easily switch between webcam and screen recording, making it an excellent tool for creating tutorials, presentations, and interviews. Also, the video camera online makes recording videos a breeze so that you can share your ideas and messages with the world.
Additionally, although the video recorder is completely free, it offers a free version with access to essential features, making it an attractive choice for those on a budget. However, users seeking more advanced functionalities might require a paid subscription.
Pros
- Offers both webcam and screen recording capabilities
- Free version available with essential features
- No downloads are required for video recording, which makes it accessible from any device with an internet connection
- Versatile and suitable for a range of video creation needs, including tutorial creation and content demonstrations
Cons
- Video quality and performance might be affected by internet connection quality
4. Record-Video-Online

For quick and straightforward webcam recordings, Record-Video-Online.com is the ideal choice. Its minimalistic approach allows you to focus solely on recording without any unnecessary complexities.
This online video recorder saves your videos directly to your browser, freeing up your device’s storage space and granting you the freedom to create without limitations. It’s an excellent choice for those seeking a quick, hassle-free webcam recording experience. However, users looking for advanced video editing capabilities might find the features limited compared to other video recording software.
Despite this, Record-Video-Online excels in providing a basic and completely free webcam recording solution, making it a popular choice for simple video projects.
Pros
- Simple and easy-to-use interface for quick webcam recordings
- It saves videos directly to the browser, eliminating the need for storage space on the device
- Completely free to use, making it an accessible option for anyone
- Suitable for users who prefer a straightforward webcam recording process
Cons
- The video quality might not match that of other premium options
5. Clipchamp Webcam Recorder

Elevate your webcam videos with the Clipchamp webcam recorder, a user-friendly online video recorder tool focusing on simplicity and efficiency. The platform provides an easy-to-use interface, making webcam recording accessible to all users, regardless of their experience level. Also, you can create captivating webcam videos with a few clicks, making your content stand out effortlessly.
With this online webcam recorder, users can record webcam footage effortlessly and add filters and text overlays to webcam recordings to enhance the videos. The online video recorder ensures a streamlined and seamless experience, allowing users to easily record videos with access to all features with just a few clicks.
While the free version of the online video recorder offers basic capabilities, some advanced features may require a premium subscription. Craft visually stunning content without complicated video recording and editing software.
Pros
- User-friendly interface with straightforward webcam recording
- Option to add filters and text to enhance videos
- All features are accessible with just a few clicks
- Suitable for beginners and quick video projects
Cons
- Limited editing capabilities compared to more comprehensive online video recorders
6. Cam-Recorder

When simplicity meets reliability, Cam-Recorder.com shines as an efficient tool to record videos and all you need is just your webcam. With a focus on providing a straightforward experience, this video recorder lets you quickly capture your videos directly from your browser and save them directly to your computer without downloading or installing, eliminating any hassle.
The tool is free to use, making it an attractive option for those seeking a simple and cost-effective solution to record videos. However, Cam-Recorder might lack some advanced features available in more comprehensive video camera tools.
The platform allows users to record videos online directly from their browser, making it accessible from any device with an internet connection. Although the online video recorder lacks some of the advanced editing features of more comprehensive tools, it provides a hassle-free way to record videos online.
Pros
- A reliable webcam recording tool for quick video capture
- Saves videos directly to your computer, ensuring easy access and sharing
- No downloads or installations are required since its accessible from any device
- Completely free to use, making it a cost-effective option for all users
Cons
- Some advanced features may be limited compared to other tools and might lack comprehensive editing options
7. ScreenApp

Are you looking for a dynamic online video recorder that can do webcam recordings and screen captures? ScreenApp.io has got your back! This all-in-one tool is perfect for creating tutorials, software demos, or showcasing your latest project.
Whether creating tutorials or software demos, this online camera and screen recording tool offers real-time collaboration features, making it perfect for creating tutorials, software demos, or showcasing your latest project during group projects. Also, this real-time collaboration feature means you can even work with your team on the same recording simultaneously.
With its screen recording features, this video recorder offers a convenient way to create comprehensive video content. The tool is free to use, making it accessible to many users. However, some advanced features may require a paid subscription.
Pros
- Webcam recording and screen capture capabilities for versatile video creation
- Real-time collaboration for teamwork and group projects
- No downloads are required, which means it’s accessible from any device without a good internet connection
- Suitable for users seeking screen recording and webcam functionality in one platform
Cons
- Video quality and performance may be impacted by a bad internet connection
8. Riverside

Riverside Online Video Recorder is for those who demand professional-grade quality in their webcam recordings and interviews. It offers advanced features to enhance the recording and interview process, making it the ideal tool for high-quality interviews and podcasts.
This professional-grade online video recorder platform exceeds expectations by offering high-quality webcam recordings with all the features you may need to ensure a seamless experience. Therefore, with videos saved in superior quality, your content will look exceptional.
Whether conducting remote interviews or collaborating with guests, this online webcam recorder has all the tools you need to produce premium content.
Pros
- Professional-grade online video recorder, ideal for high-quality interviews and podcasts
- Offers advanced features to enhance the recording and interview process
- Saves videos in high quality for professional-looking content
- Great for users seeking reliable and top-notch webcam recording capabilities
Cons
- For recording video experiences seamlessly, you will need a good internet connection
9. Movavi Webcam Recorder

For those looking to record videos with audio, Movavi Webcam Recorder is here to deliver. This reliable video camera tool allows you to record videos from your webcam while preserving the accompanying audio for enhanced content.
Record videos with sound and enhance your video content’s overall quality and engagement. While offering basic editing capabilities, this screen recorder has more advanced features that can be accessed through premium versions.
Pros
- Reliable webcam recording tool with audio capture for enhanced video content
- User-friendly interface, making it accessible to users of all experience levels
- Suitable for users seeking a straightforward webcam recording experience
- Basic editing features are available to enhance video content
Cons
- You may need to download the software to record videos, limiting access to specific devices
10. Pixect Online Webcam Recorder

Are you searching for a webcam recorder that delivers simplicity without compromising performance? Pixect video recording tool simplifies webcam recording, providing a straightforward solution for users looking to create videos without fuss.
Whether you want to capture special moments or share your thoughts, this free video camera saves you time by removing unnecessary complexities. Accessible directly from the browser, Pixect is designed to make webcam recording hassle-free and fun.
Pixect removes the complexity from webcam recording and replaces it with a refreshingly straightforward interface. No more confusing menus or hidden buttons – just click and capture! In addition, it focuses on the core: recording your webcam with clarity and precision, ensuring you create compelling videos effortlessly. To top it all, recording video content using this online video recorder is free, making it the go-to choice for those mindful of their budget.
Pros
- A straightforward interface ensures easy and quick webcam recordings
- Eliminates the need for downloads and installations, making it easily accessible from any browser
- Focuses on core webcam recording features
- Suitable for users on a budget
Cons
- Limited editing features
Frequently Asked Questions on Online Video Cameras
a) What is the difference between a screen recorder and an online video camera?
A screen recording is a soundless video of your screen that captures all of the clicks, scrolls, and movements occurring on-screen during the recording.
In contrast, a webcam recording is a screen recording that simultaneously uses the webcam to produce a video that features you and your voice. The webcam recording will be a screen recording with video and sound.
b) How do I share the recorded video?
Zight will automatically create a shareable link for your video once you finish editing and copy it to your clipboard. You can paste that link to any chat, email, Slack, Facebook, or Skype conversation.
c) How do I edit the expiration date of my created content?
To do it through the app:
- Open Zight and click on the lock icon, or you can tap on the three dots next to your content and click on ‘secure item.’
- Tap on the box below, ‘when does this link expire,’ and choose the duration according to your preference.
To do it from your web dashboard:
- Open your web dashboard.
- Click on the ‘eye’ icon for the content you wish to edit.
- Click on the ‘share’ button on the viewer page and click ‘edit.’
- Tap on the box below, ‘when does this link expire,’ and choose the duration according to your preference.
Here at Zight, we help users create online videos using the Zight Camera. Try it for free today, or get a demo to see how Zight’s online video camera tool can help you create and share videos faster.