
Developers are constantly being forced to find new tools and accessories to optimize and speed up their workflows. If you’ve been developing for any amount of time, you know with each tool comes more complexity to your stack. It can seem counterintuitive to take the time necessary to learn a new skill or tool. However, once you master it, it can make your stacks quicker and more efficient to build. The same can be said for webpack.
Webpack can be seemingly odious and, quite frankly, even overwhelming to learn. If you’re wondering ‘why use webpack?’, or even looking for a more fundamental answer to questions like ‘what is webpack in JS’ and ‘what are webpack bundles?’, you’ve come to the right place. We’ve provided a beginner’s guide to get you started. We cover the basic definition of webpack, how it works, dependency graphs and some great tools to use in conjunction with it.
What is Webpack in JS?
Let’s start with the very fundamental question: What is webpack in JS?
Essentially, webpack is a static module bundler and task runner. Now, if you’re saying to yourself, ‘I thought webpack was just a static module bundler?’, you wouldn’t necessarily be wrong. Webpack may have started as a module bundler. However, as the developer community created more webpack plugins, the lines between bundler and task runner have become increasingly blurred. Many developers are opting out of using individual bundlers and task runners because webpack does both – really well.
In addition to this, webpack is still becoming an increasingly diverse tool. It gained popularity thanks to Hot Module Replacement (HMR) and React. It’s even been used in the web Framework builder Ruby on Rails. However, webpack isn’t just limited to the web, you can use it to build other targets as well.
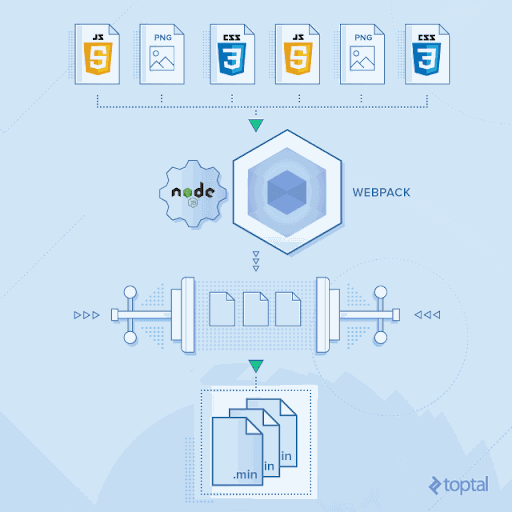
One of the benefits of webpack is that it puts all your assets, such as fonts, CSS, images, Java-Script, and so on, into a dependency graph. A dependency graph describes how each module or file will depend on another. The word static in ‘static module bundler’ refers to the fact that webpack executes the source code but adds modules and their dependencies together into a bundle when it is constructing a dependency graph.
This is incredibly handy if you have assets that aren’t made of code, such as a web font or an image. You can provide these non-code assets as a dependency for your application. As you build your application, webpack builds dependency graphs derived from the modules your application needs. When it comes time for your app to be loaded into the browser, webpack bundles all the modules into a small number of bundles to load quicker. But we’ll dive into this later.
Why Use Webpack
Building web applications isn’t as simple as it used to be. Let’s face it, writing JavaScript and jQuery just doesn’t suffice anymore. So, which bundling tool should you use? Most developers will be deciding between webpack or Browserify with Gulp.
Webpack, as previously mentioned, bundles components. Gulp, on the other hand, is a task runner. So, intuitively, you may have expected to see Gulp used with webpack. However, it’s becoming more and more common among developers to use webpack as a replacement for Gulp.
Why use webpack instead?
Webpack is a powerful and versatile tool. Most of the tasks you’d need a task runner for, webpack comes ready to perform already. The only major tasks webpack can’t perform are unit tests and linting. Not independently, anyways. When it comes to source maps and minification for your bundle, webpack is up to the task.
Many developers find gulp frustrating to debug, they find over-dependency on plugin authors as well as disjointed documentation. Because of this, many are switching over to webpack.
Webpack: Core Functions
Before we really dig into webpack, there are a few fundamentals you’ll want to understand. Trust us, it’ll make life a whole lot easier down the road to have a basic understanding of these main concepts before jumping into webpack’s practical implementation.
First up is Entry. What’s entry? The entry point is the module. Webpack will use this when it starts building the internal dependency graph for your app. Once it has its entry point, it will start determining what modules and libraries it depends on. It will do this until there are no dependencies left. When you start, webpack will automatically be set to assume the entry property is ./src/index.js. However, you are able to change this to a different file, or even multiple files, in the config file.
Secondly, a basic concept you’ll want to master is output. Output is a property that will instruct webpack where to emit your bundle(s) and what it should name that file(s). By default, this property is set to ./dist/main.js for your main bundle, and then ./dist for other generated files. To change it, simply specify a different value(s) in the config.
Next, let’s talk about loaders. By default, webpack only understands JSON and JavaScript files. Depending on what you’re building, you may need webpack to process other types of files. This is where loaders come in. Loaders transform the source code of non-JavaScript modules into valid modules. This will allow these files to be processed before adding them to the dependency graph. One of the benefits of webpack loaders is they can convert a vast range of languages to JavaScript. Some will even allow you to import CSS files directly.
Next, one of the most essential basics is an understanding of plugins. What is a webpack plugin? A webpack plugin is typically used if you have a task where a loader won’t do the trick. For example, if you need bundle minimization, asset management and so on, you’ll use a webpack plugin.
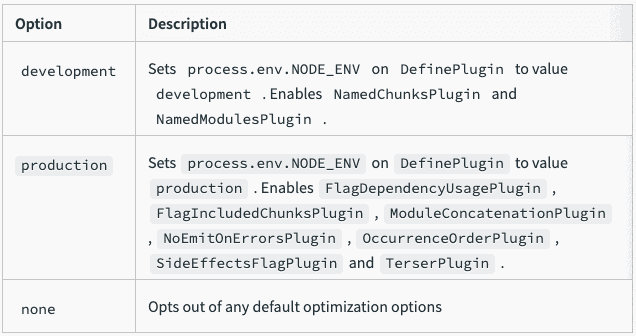
Lastly, you’ll want to understand mode. The mode configuration option will tell webpack to use its built-in optimizations accordingly. There are three modes you can set: development, production and none. If you don’t set a mode, the default is production.
How Does Webpack Work With Dependencies?
Now that you have a basic understanding of what webpack is, you may be wondering ‘how does webpack work with dependencies?’. We’ve already touched lightly on dependency graphs but having a full understanding of how webpack works with dependencies will help you breeze through your first project.
Depending on how experienced you are with web development or even computer science, dependencies can seem overwhelming. We’ll give you a more fundamental understanding that will hopefully help you feel less overwhelmed, and more ready to start your first project.
With the use of the loaders and plugins we mentioned, webpack is able to bundle JavaScript code, as well as non-code assets like web fonts and images into a file. As it bundles, webpack processes all the necessary tasks for managing and optimizing code dependencies. This could include minimizing, pressing, compiling and so on.
One of the first concepts you’ll need to understand is how to configure aliases and relative paths. Relative paths are used when defining dependencies. Depending on how complicated the file structure for your project is, you may have a hard time resolving relevant module paths. If you’ve configured your webpack project, it can help simplify the definition of relative paths.
Imagine this is your project structure:
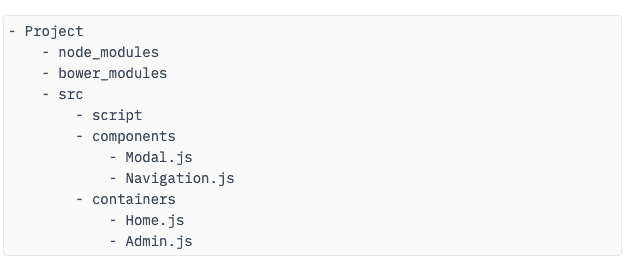
You can use relative paths to reference dependencies to the files you need. If you want to import components into source code, or into containers, it looks like the photo below.
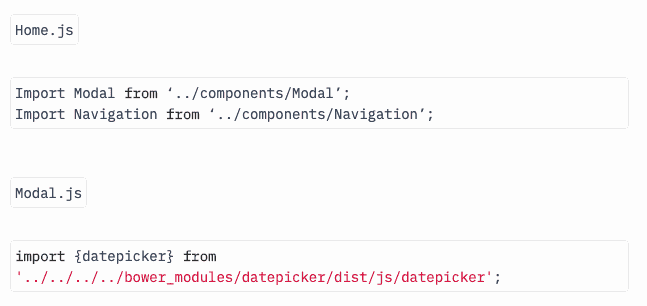
Relative paths have the potential to get incredibly complex. If you have a large project with a nested file structure this is especially true because every time you want to import a module or a script, you’ll need to know the location of the current directory and search for the relative path to what you need to import.
But don’t worry – this can be easily remediated. Simply use webpack’s resolve.alias option. You can use this option to declare an alias name for your directory or module with its location. Then, you won’t have to rely on relative paths in the project’s source code. Phew.
Code Splitting
One of the benefits of webpack is the ability to code split. Code splitting, also known as code on demand, means you can split your code into various bundles. You can then use these bundles on demand or simultaneously. There are three general approaches to code splitting:
- Entry points: use the entry configuration to split code manually
- Prevent Duplication: Dedupe and split chunks with the SplitChunksPlugin
- Dynamic Imports: Use inline function calls within modules to split code
Each method of code splitting has its pros and cons. Make sure you’re using the right method for your specific project. Keep in mind once you start code splitting, you may want to check the output to see where modules have ended up.
Is Webpack Needed for React?
If you’re building an app with React, you know there is an overabundance of templates to choose from. These templates, which are used by thousands of developers, can support developing apps at an incredibly large scale. However, they leave the bundle output and developer experience set at certain defaults. Depending on your React project, these defaults may not be the best option for you.
So, is webpack needed for React?
The short answer? No. However, if you want a greater degree of control over your app building process, it may be wise to invest in a custom webpack configuration. It’s not complicated to do, and it could help you build quicker and better code for your project once you get the hang of it.
Benefits of Webpack & Zight (formerly CloudApp)
The world of development is ever-changing and evolving. Keeping up with all these new progressions in development can be challenging. However, there’s one essential developer tool that is a must for any dev wanting to save time: Zight (formerly CloudApp).
Did you know an astonishing 60% of people prefer to collaborate visually if possible?
And Zight (formerly CloudApp) makes it easier than ever.
Zight (formerly CloudApp) works seamlessly with your tools as a developer to help you save time, work more efficiently and communicate clearly with your team. You can report bugs even faster with a GIF, an annotated screenshot or by using a screen recorder. There’s even a free code review tool so you can ship quality code quicker.
We all know there’s enough typing involved with coding already. And we’ve all gotten those messages back saying: “I don’t get it”, “Can you show me?”, “I can’t see what you’re talking about”. Instead of explaining a bug or an issue in an email or message, send a quick annotated screenshot or GIF in a mere few seconds with Zight (formerly CloudApp).
Conclusion
Hopefully, now you have a better understanding of webpack, how it works, dependency graphs, and some great tools to help speed up communication between you and your team. Webpack can seem intimidating to master. However, once you do, your workflows will become quicker and more efficient to build. Webpack is an incredibly useful and powerful tool. We hope you have a better understanding of the fundamental concepts. Keep in mind, this article only scratches the surface. Webpack offers a plethora of plugins, features, and techniques. As you learn more about webpack you can customize it to work best for how you use it.
While you’re learning more about webpack, don’t forget to pick up a free download of Zight (formerly CloudApp).